
DTF transfer design featuring a bold white brand name with a fiery explosion and 'New Jersey' tagline

Avoiding Common Mistakes When Ordering DTF Transfers

Avoiding Common Mistakes When Ordering DTF Transfers

DTF transfers are a popular solution for custom garment printing. However, many issues arise from avoidable setup and production errors. Understanding common DTF printing mistakes helps ensure cleaner results and longer-lasting prints.

This guide highlights what to watch out for when ordering custom DTF transfers, so you can achieve professional results every time.

Using Low-Quality Images

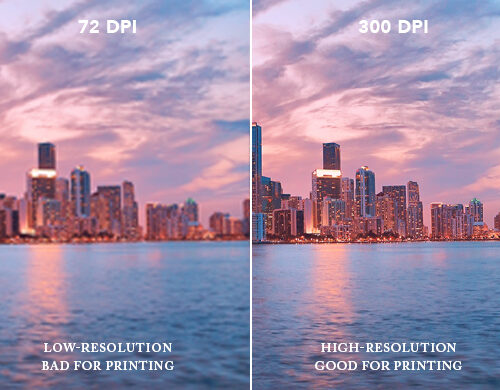
One of the most common DTF printing mistakes is submitting low-resolution artwork. Low-quality images often result in blurry and unprofessional prints, especially at larger sizes. For best results, artwork should be supplied at a minimum of 300 DPI. High-resolution files help DTF transfers reproduce sharp edges and clean detail.
custom DTF transfers DTF printing mistakes DTF heat press application

Incorrect Resizing of Images

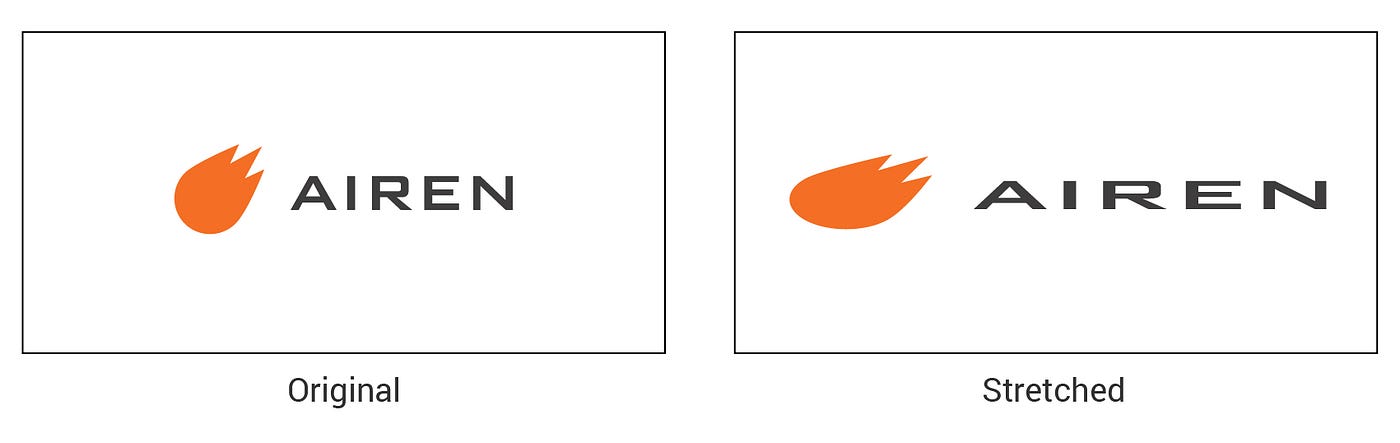
Improper resizing can distort artwork and affect the final print. Stretching or compressing a design without maintaining the correct proportions can make it look unbalanced. When preparing custom DTF transfers, designs should always be resized proportionally to preserve their original appearance.
custom DTF transfers DTF printing mistakes DTF heat press application

Ignoring Bleed and Margins

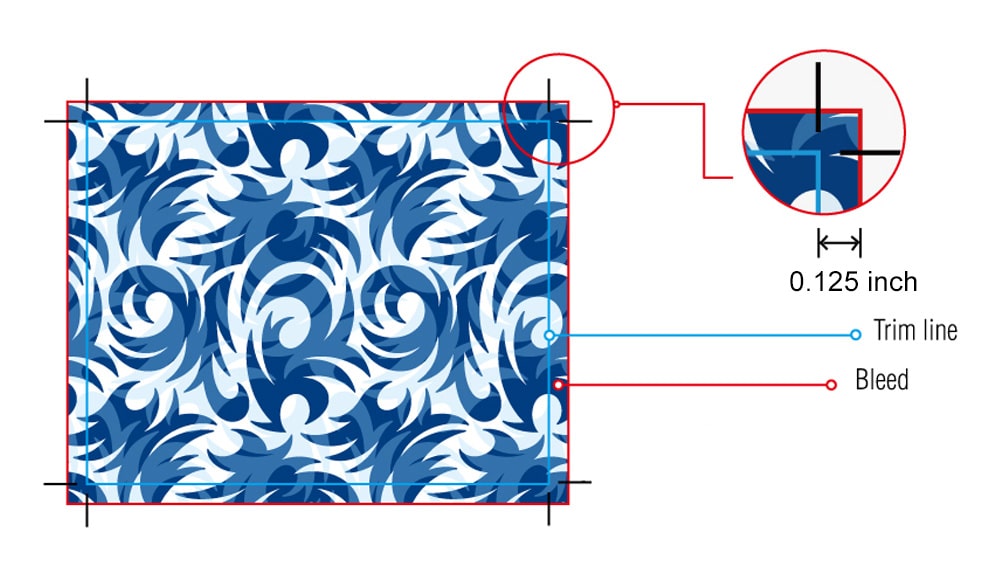
Another common issue is failing to account for bleed and margins. If artwork is cut too close to the edge, important details may be lost. Allowing an extra 3mm around the design helps protect it during trimming and reduces production-related DTF printing mistakes.
Choosing the Wrong Colours

Colours can appear very different on screen compared to fabric. Designing in CMYK rather than RGB helps improve colour accuracy for DTF transfers. While Pantone colours offer better consistency, minor variations can still occur once printed.
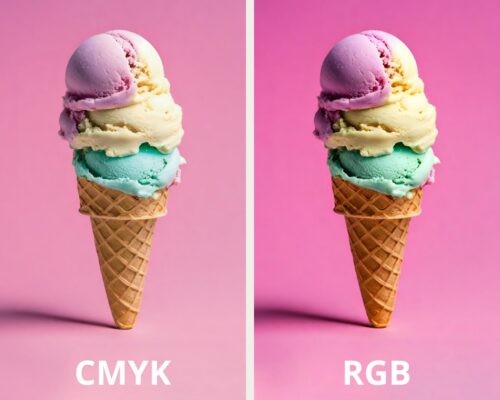
Two ice cream cone images illustrating the colour difference between CMYK and RGB

5. Overlooking Small Text and Details

Very small text and fine details do not always transfer well onto fabric. If elements are too small, they may lose clarity during printing. Make sure all text and intricate details are large enough to remain legible once applied to the garment.

Not Considering the Fabric Type

Different fabrics react differently to heat and adhesive. Using the wrong transfer type for a specific fabric can affect durability and appearance. Checking fabric compatibility in advance helps avoid unnecessary DTF printing mistakes and ensures better longevity.

How to Apply DTF Transfers Correctly

Once your DTF transfers are ready, applying them correctly is just as important as ordering them properly. Following the right process helps ensure a strong and clean finish.

Set the Right Temperature and Pressure
For polyester garments, use a temperature of 120°C with medium pressure for 15 seconds. For t-shirts, set your heat press to 155°C and press for 10 seconds.

Prepare the Garment
Before applying the transfer, carry out a blank press for 5–7 seconds. This removes moisture and smooths the fabric, allowing the transfer to adhere more effectively.

Cold Peel Only
DTF transfers should be cold peeled. After pressing, allow the garment to cool completely before peeling away the film. This helps prevent damage to the design.

DTF Transfer Tutorial - Embroidery Badge UK

Spotting Quality Issues in DTF Transfers

Always inspect transfers during and after application. Blurry edges, colour inconsistencies, or visible outlines can indicate issues with artwork or DTF heat press application. Catching these early helps maintain a professional standard and protects your brand reputation.


Conclusion

Avoiding common DTF printing mistakes starts with proper artwork setup, correct fabric selection, and accurate application. When DTF transfers are prepared and applied correctly, they deliver clean, durable, and professional results.

If you need help with your next order of custom DTF transfers, feel free to contact EmbroideryBadge UK.

dtf transfer, custom dtf transfers, stitch effect transfers, dtf transfers – stitch effect transfer printed on a school hoodie, demonstrating application by Embroidery Badge UK

How to Apply DTF and Stitch Effect Transfers

How to Apply DTF and Stitch Effect Transfers

DTF (Direct to Film) transfers have become increasingly popular due to their versatility and ability to produce vibrant, high-quality prints on a wide range of fabrics. Alongside custom DTF transfers, Stitch Effect transfers offer the appearance of detailed embroidery without the need for stitching. In this guide, we walk through the step-by-step process for applying both types of transfers to achieve consistent, professional results.

Step-by-Step DTF Transfer Application Instructions

Step 1: Pre-Heat the Press

Start by setting your heat press to the correct temperature. For most fabrics, this will be 155°C. If you are pressing onto polyester, lower the temperature to 120°C to avoid heat damage. Once the press reaches temperature, place the garment on the platen and ensure it is lying flat. This helps apply even pressure during pressing.

Step 2: Pre-Press the Fabric

Before applying the transfer, remove moisture from the garment by pressing it for 5 seconds without the transfer in place. This pre-press step improves adhesion by ensuring a dry, smooth surface.

Step 3: Position the DTF Transfer

Place the DTF transfer in the desired position on the garment. Make sure it lies flat with no wrinkles or movement. Accurate positioning is important, as the design will be permanently fixed in this location.

Step 4: First Press

Cover the transfer with protective or release paper supplied with the transfer. Press the garment for 10 seconds using medium to firm pressure. This allows the adhesive to activate and bond to the fabric.

Important Post-Press Steps

Step 5: Peel the Transfer

Custom DTF transfers can be peeled either hot or cold. However, for best results, we recommend a cold peel. Allow the garment to cool completely before peeling the film away. Roll the film off in one smooth, controlled motion to prevent lifting or distortion.

Step 6: Second Press for Durability

After peeling, place the garment back under the heat press. Cover the design again with release paper and press for an additional 5 seconds. This second press helps secure the transfer and improves durability, particularly through repeated washing.

Step 7: Inspect the Final Product

Remove the garment from the press and inspect the transfer. Ensure the design is fully adhered, smooth, and free from lifting or wrinkles. At this stage, the transfer should appear vibrant and securely bonded.

Additional Notes and Best Practices

While the steps above provide a reliable guideline, temperatures and timings may vary depending on the fabric and equipment used. Keep the following points in mind:

  • Perform a test press when using a new fabric or transfer type, especially with heat-sensitive materials such as polyester or performance fabrics.

  • Use medium to firm pressure to ensure proper adhesion. Too little pressure can cause lifting, while excessive pressure may damage the fabric or transfer.

  • Adjust temperatures for polyester, keeping the press at 120°C to avoid scorching or fabric distortion.


Stitch Effect Transfers: A Unique Embellishment Solution

Stitch Effect transfers offer the look of embroidery without the time or cost associated with traditional stitching. They are particularly popular for school bags, uniforms, and workwear where an embroidered appearance is desired.

The application process for Stitch Effect transfers is the same as for DTF transfers. The same temperatures, pressures, and peeling instructions apply, so you can follow the steps above for both transfer types.


Why Choose DTF and Stitch Effect Transfers?

DTF and Stitch Effect transfers offer several advantages:

  • Vibrant colours with high-definition detail across a wide range of fabrics

  • Versatility, allowing application on cotton, polyester, and blended materials

  • Durability when applied correctly, with resistance to fading and cracking

  • Embroidered appearance with Stitch Effect transfers, without the higher costs or production time of traditional embroidery